Sometimes we get so focused on the food items we would want our family to have in an emergency situation, we fail to think about how we would use any of it without electricity, refrigeration or other of the modern conveniences we so take for granted everyday. Other times, we're not getting the most bang for our (for most of us) limited budget, because we don't have the equipment necessary to properly preserve or store the foods we would like to. In this light, I've put together a list of some of the items that I would consider essential, (or very helpful) in addressing these issues. Since we've been married, we have an ever-changing wish list of items we would like to have "someday."
Wish lists can be powerful things. Just as they say that a goal is only a wish until you write it down, a wish list, once written down, can become a roadmap towards reaching your goals. This especially applies to Family Home Storage and Preparedness. Writing down all your "wish list" items, then prioritizing them in order of importance and usefulness, then setting specific, realistic and attainable goals as to how and when you plan to acquire each item, can go a long way to making these things possible.
For us, it was as simple as creating the list, in priority, and then committing to purchase one item from the list every year. Sometimes this has been a mutual Christmas gift to each other; other times when we've had some extra or unexpected cash, we've known where we wanted to spend it. Sometimes you'll be lucky enough to "inherit" some of the items on the list. I'm always searching the local thrift stores, and once in awhile garage sales for these items. We've also been able to find deals on the internet, (an invaluable tool for pricing and researching this stuff,) on sites like amazon.com, ebay.com and through various search engines.
Following are some of the "tools" that I think could be important to any family's FHS plan. This includes stuff for home production, preservation, storage and emergency preparedness items. This should at least get you thinking. Many of these are big ticket items, but a few of them cost next to nothing and can even be made at home. I've included pictures and ballpark prices of what you can expect to pay, (from the cheapest available to top-of-the-line) as well as basic info and what each is used for. The prices would be for new, or like new items...garage sales & thrift stores are wonderful for finding amazing deals on these items, so don't forget to look there!
A Wheat Grinder/Grain Mill: $180-$300 & up
This is perhaps one of the most overlooked items that is essential to food storage. If you are LDS, you should know that in a survey done by the church, 90% of people that actually store wheat in their homes DO NOT OWN a wheat grinder. If you're storing wheat and don't have a grinder, should you find it necessary to use your food storage, you'll still be able to eat it, you'll just be limited in your options: boiled or sprouted wheat. With a wheat grinder, you'll be able to make FLOUR. And obviously, flour gives you a whole lotta options. NOTE: many are not aware that wheat has a 30+ year shelf life. When it's ground down into flour the shelf life becomes 10 years. This is the reason for storing wheat over flour, although there are practical reasons for storing both.
Most wheat grinders can also double as grain mills and can grind corn meal, rice flour, baby cereal, etc. This is an item that you will want to go for quality on. The higher end, more versatile models can grind dry grains, spices, and beans. If you're wondering what you can grind, WonderMill has set up an interesting blog called Will It Grind? that gives an extensive list as well as demonstrations for both their electric and hand models. Look into WonderMill, BlendTec and NutriMill among other brands. The WonderMill Electric Grain Mill is on my wish list for many reasons. Here is a comparison review between the two that I thought was helpful.
A Hand Wheat Grinder/Grain Mill: $70-$300 & up
A hand grinder is essential to an emergency plan in the event that there is no power. The WonderMill Junior Deluxe is on my wish list because it has no plastic parts (that will melt or break with regular, extended use) and it will grind dry grains, beans, legumes, spices, oily grains, (like flax seed or coffee) and even makes various nut butters. This hand mill also comes with a pulley that can be attached to a stationary bike...nothing like getting a good workout in while you grind your wheat!
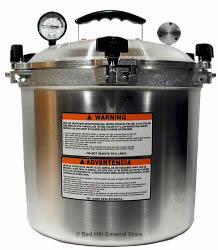
A Pressure Canner - $70-$300 & up
This piece of canning equipment is necessary to safely process low acid foods such as meats, vegetables and seafood. A pressure canner uses heat and pressure to bring the internal temperature of foods to 250 degrees or more for a specified period of time. Being able to can our own meat has saved us a lot of money, allowing us to take advantage of sales, and has greatly increased the variety of meals we can make exclusively from our food storage.
On the lower end, pressure canners have gaskets, which will need to be replaced over time. On the higher end, pressure canners have metal on metal seals. I've opted for a higher end All American Pressure Canner, since I had borrowed one for awhile and was using it frequently. We knew that we would be getting lots of use out of ours, so it was worth the investment to us. Either will do the job for you, so research and decide what makes the most sense.
A Water Bath Canner: $20-$50
A Water Bath Canner is what most people think about when they talk about "canning." It's a really large pot, with a rack inside, allowing you to lower your jars into and out of, a boiling water bath. This canning process is acceptable for fruits and tomatoes, because of their high acid content. NEVER can vegetables or meats in a water bath canner, since the temperature will not get hot enough to kill bacteria, which can lead to botulism, which can be deadly. These guidelines were changed in 1988, so recipes for meat or veggies from prior to 1988 calling for water bath canning should always be processed in a pressure canner for the appropriate amount of time. Time tables are readily available online. In my experience most water bath canners are very similar, so go for the best deal you can find. Be sure to check out garage sales and thrift shops, since there are many people who get these and then never use them. Don't worry...with your self-sufficiency mindset, you'll be getting plenty of use out of it!
A Vacuum Sealer w/port, tubing & jar sealer attachments: $40-$175
A vacuum sealer is a great appliance for helping to effectively store all your dry foodstuffs. With the tube and jar sealer attachments, (both regular and wide mouth) you can vacuum seal mason jars, extending the life of your dry goods by up to five times. Nuts, raisins, chocolate chips, chow mein noodles, dehydrated fruits and veggies, brown rice and other items particularly sensitive to spoilage in your short-term pantry supplies are perfect for this. NOTE: a vacuum sealer does not replace heat canning or refrigeration for preserving food. It is a suitable means of extending the shelf-life of already shelf-stable dry goods, ONLY. The model pictured is quite a slick, stainless steel, newer model. An older model in white or ecru will also work just as well. Be sure to check garage sales and thrift stores. I've found two food savers in the last month at our local DI thrift store for $5 a piece.
The main thing you're looking for in a food saver is that it has an accessories port, which you can hook a tube into. This is because you'll want to also get the tubing and mason jar sealers, pictured here (I would recommend getting both the regular and wide-mouth sizes) so you have the capability of sealing your jars. The jar sealer attachments can be found on amazon.com or ebay.com for about $6-$10 each. I wouldn't pay over $10.
A Food Dehydrator: $90-$350
Be careful in selecting one of these, as the old adage really applies here: you get what you pay for! Make sure you find one that has a fan, not just a heating element, and preferably a temperature gauge. Drying your foods at temps no less than 100*F and no more than 125*F will ensure you maintain the highest content of vitamins, nutrients and enzymes. A quality mandolin, or electric meat slicer will assist you in slicing fruits and veggies more quickly (which is always nice,) but more importantly more evenly, ensuring a more even drying time, (your entire batch should be done around the same time) and also a prettier finished product. Who doesn't like pretty things? I aspire to an Excalibur, by most accounts to be the Cadillac of the dehydrating world. For right now, we found an eight tray GardenMaster by Nesco on Amazon for $93 including shipping. It is working wonderfully well for all my projects, and was much more in our price range for this stage in our lives. The Excalibur will do more, a bit more conveniently and quickly, so eventually I would like to get one. The GardenMaster has a fan and a temperature control, and we've been very happy with it.
A Solar Oven: $229 - $400
We just took our Solar Oven out for it's maiden voyage at a week-long camping trip, and we FELL. IN. LOVE. It works AMAZINGLY well, and heated to 350* all on the simple power provided by the sun. We baked fresh, warm, lovely brownies, coffee cake, and blueberry shortcake out in the middle of the forest. The solar oven will also bake bread, cook a turkey, pasteurize water and bake, cook, steam or boil anything else you would cook in your oven at home. We have a Global Sun Oven, because they got the best reviews of the ones we researched. The company now has a newer model, released in March 2013, called the All American Sun Oven, which has a few more bells-and-whistles and is supposed to be able to get even hotter, (between 360*-400*F.) If we were buying one now, this would be the model we would get. It is a big ticket item at $345, but keep your eyes peeled for a deal...be aware that there will be a price for having the newest model. We got our oven with the "Preparedness & Dehydrating" package, which includes all the racks, pots and pans at Christmastime for less than $250. It's also the older model, but if you're willing to put up with a dinosaur to save $100 bucks, the Global Sun Oven gets high reviews from us and lots of others!
We have small children as well as dogs, so I was nervous about how hot it would get. The actual outside surface of the box and the wood edge (on the outside of the reflectors) never even got warm to the touch. The glass door (inside the reflectors) and the inside of the oven got very hot...350 degrees hot...it IS a real oven, so you'll want to be sure to also pack your oven mitts! My husband learned this the hard way, and as we both laughed, he quipped about it being hard to take a little box seriously as a real oven, until you touch it. :) The external surface of the box is fully insulated so it removed any worry I had of the kids accidentally bumping up against it. The oven door latches completely closed, and is sealed by a rubber gasket, so while the dogs loved their warm naps right next to it, (it was always in the sunniest spot in our camp) they never tried to disturb it in anyway.
A Wonder Box Cooker: DIY for around $20 - $30
The Wonder Box Cooker is an amazing little contraption that utilizes insulation as a means for conserving fuel, and cooking food by maintaining the heat for an extended period of time. The general method is to use your fuel to bring your food to a boil, then transfer it into the cooker, where it maintains it's temperature and continues to finish cooking using no fuel at all! It takes a few yards of fabric, access to a sewing machine, minimal sewing skills and stuffing. You can find a tutorial, additional information and recipes here.
A Rocket Stove: DIY for FREE!
This is another amazing invention that utilizes proper airflow and ventilation to cook foods with minimal fuel at maximum efficiency. You can make one yourself using a #10 can, (like a large coffee can or LDS cannery can) and four other smaller soup cans, along with some sand. You'll need tin snips and a sturdy pair of gloves. This stove will cook HOT on only a handful of very small twigs at a time. You can find tutorials online and on YouTube, and I found this video, along with the follow-up videos extremely helpful: Build a Rocket Stove, Step-by-Step.
A Double Burner Propane Camp Stove: $85 - $150
This is a must for canning in the summer time, in my opinion. Then all that lovely heat can stay outside and doesn't have to congregate inside my home! Also great for avid campers, (like us,) and for obvious reasons, this would be handy to have in the event of an emergency.
Showing posts with label How Ya Gonna Cook It?. Show all posts
Friday, May 31, 2013
Friday, May 10, 2013
The Wendy DeWitt Food Storage Seminar
A few years ago, while perusing the internet, I stumbled onto this video, which I watched in it's entirely, and have watched several times since then. I've also shared it as much as possible, since I believe it's one of the most clear and concise seminars on Food Storage I've ever heard.
As you create a plan for your family, you're going to have to tweak things based on your budget, family size, storage arrangements, what you're comfortable storing, etc. There are many things in this seminar that might not be for you. But I believe it's a great beginning to get you thinking about possibilities and how you can start today to get your family prepared.
The booklets discussed in this class are offered free of charge in both English and Spanish. Email Wendy DeWitt at wdewitt22@gmail.com and put "booklet" in your subject line. She will email you a pdf copy. Her blog is also available with other information at everythingunderthesunblog.blogspot.com.
As you create a plan for your family, you're going to have to tweak things based on your budget, family size, storage arrangements, what you're comfortable storing, etc. There are many things in this seminar that might not be for you. But I believe it's a great beginning to get you thinking about possibilities and how you can start today to get your family prepared.
After watching this video, I began working on a specific "plan" for our family. We have always tried to set some extras aside, and have done a pretty good job of it. But as far as having a specific plan, or any rhyme or reason for what we were storing, well...that was an area that could use some improvement. We began to think more specifically about what we wanted to do. This is when things really got fun, and when we were really able to incorporate preparedness as a way of life. Family home storage, food storage, production and preservation isn't something we do. It's how we live. This makes life a lot more simple, organized and less financially stressful. It does take planning, organization and the desire to do it...as well as a healthy dose of adventure - being willing to be a bit flexible with learning new skills, and in some cases changing a lot about your family's shopping, cooking & eating habits.
By formulating an outline for your family, you'll have specific, measurable goals...and suddenly the whole thing doesn't seem so overwhelming. In any area of life, careful planning allows you to use your time, effort and resources more efficiently, thus getting more out of anything you're doing. Getting more "bang" for your buck! Family home storage is no different. Watch this video and then sit down for a few minutes and create an outline of the various areas of preparedness that she talks about. By planning your work, and then working your plan, you will be able to attain steady, measurable progress towards the preparedness and peace of mind that you so obviously want for your family. You know you want to...otherwise you wouldn't be taking precious moments out of your crazy day to read blogs like this...so go do it!
The booklets discussed in this class are offered free of charge in both English and Spanish. Email Wendy DeWitt at wdewitt22@gmail.com and put "booklet" in your subject line. She will email you a pdf copy. Her blog is also available with other information at everythingunderthesunblog.blogspot.com.
Sunday, May 5, 2013
The Wonder Box Cooker
I wish I could take credit for this whole thing, but I'm just not that smart. Whoever came up with the Wonder Box Cooker, is in my opinion, pure genius. The basic idea behind a Wonder Box Cooker is to make the most efficient use of limited fuel resources. They were originally designed for use in third world countries, specifically Africa, where fuel is limited as are most other resources. The Wonder Box Cooker essentially works like a vacuum flask, keeping food at the required temperature for cooking, using very little fuel. It takes about 10-15 minutes of fuel to bring food to a boil, and then the insulated Wonder Box Cooker will maintain that temperature while the food is thoroughly cooked. On the other hand, it will keep ice cream cold for about 4 hours.
I Also wish I could give specific credit for the following items, but it's been so long since I gathered them, that I'm not aware who should be thanked. I am italicizing the information that has been passed along to me, and the additional instructions that I found online several years ago:
"The Wonder Box Cooker recipes and instructions originated from a booklet published by Compassion of South Africa in 1978,1979 and 1980. Compassion registered the name Wonder Box. This information may be freely quoted, acknowledgments being made to Compassion."
Brief Instructions:
Boil your food on the stove for 10 – 15 minutes until the food is heated right through. (In practice this is too long.)
Use any cooking pot, provided it does not have a long handle, but do not use a large pot for a small amount of food. The W'box does not work well if there is a large air space. Remember that the more food or liquid that you have in the pot, the longer and better it will cook.
Put the lid on the pot before you remove the pot from the stove so the lid can also get hot. Make sure the nest in the bottom cushion is ready to take the pot and that it is nearby so you do not lose heat carrying the pot around. Place pot into the nest of the W’box, making sure that the sides are snug against the pot, so there are no air pockets. Quickly cover the pot with the top cushion, making sure there are no gaps or air pockets. Make sure that no one peeks inside. If this happens, heat will escape, and the food will not cook properly.
Do not leave the Wonder Box Cooker on a metal surface while it is being used. Metal is a good conductor of heat and may draw off some heat through the bottom.
When cooking anything like a roast or a whole chicken, the liquid around it can boil before the meat has reached the same temperature. Make sure the liquid covers the meat and it has come to a boil. Meat must be covered with liquid! The cooking time seems to be 3-4 hours, or all day. It is sure to never burn.
Note: We had a chicken that was put in at 9:30 in the morning before church. This single dad prepared the chicken by placing it into an oven-cooking bag. He added spices to the chicken closed the bag completely (no added moisture was added to the bag) then brought the pot of water with the chicken in, to a boil and put it all in to the W’box. We ate with him at 4:00pm and as he tried to carve the chicken that was well cooked; the steam was ‘rolling’ off the chicken. It was still so hot he worked with forks to carve it. Nb: the opening to the bag was left protruding from under the lid.
The Wonder Box Cooker was designed for cooking meals, but it can also be used for keeping food hot, cold or frozen for 3-6 hours depending on what it is For example, frozen meat will stay frozen longer than a tub of ice cream.
The cushions filled with polystyrene can be washed with hot water and soap and hung on the line to dry.
For obvious reasons, the Wonder Box Cooker can be an integral part of your family preparedness plan, since it would help stretch a limited fuel/energy supply in any kind of emergency situation. If you would like to incorporate this little gem into your family's preparedness plan, see my other posts, The Wonder Box Cooker Tutorial and Wonder Box Cooker Recipes.
Labels:
DIY,
Emergency Cooking,
How Ya Gonna Cook It?
Wonder Box Cooker Tutorial
Now that you've discovered the magic and possibilities of the Wonder Box Cooker, here's how to make one for your family! Again, I wish I could give proper credit for this information and the adorable pattern, but it was passed along to me. I'm freely sharing in the interest of preparedness. :)
I personally found the instructions to be helpful as a basic guide, but you'll find that you're working with a big floppy mass of fabric most of the way through the process. Just remember that once you've gotten it stuffed, it should resemble a big cube, that you can set your pot in the middle of. My little brother made 2 of these things as Christmas gifts, and I know if HE can do on his own, so can YOU! My first Wonder Box Cooker turned out like this:
I followed the basic layout of the pattern and sewing instructions, but I took a few liberties in the design. I also found that once I had stuffed my Wonder Box, it would hold it's shape better if I tacked each of the corners down with a few hand stitches, (which you can see in the photo.) We went to WalMart and bought a bag of bean bag fill to stuff it with, for around $12. It turned out to be enough stuff to fill almost two of them!
Following are the instructions and pattern. I am italicizing all information that has been passed on to me.
I personally found the instructions to be helpful as a basic guide, but you'll find that you're working with a big floppy mass of fabric most of the way through the process. Just remember that once you've gotten it stuffed, it should resemble a big cube, that you can set your pot in the middle of. My little brother made 2 of these things as Christmas gifts, and I know if HE can do on his own, so can YOU! My first Wonder Box Cooker turned out like this:
I followed the basic layout of the pattern and sewing instructions, but I took a few liberties in the design. I also found that once I had stuffed my Wonder Box, it would hold it's shape better if I tacked each of the corners down with a few hand stitches, (which you can see in the photo.) We went to WalMart and bought a bag of bean bag fill to stuff it with, for around $12. It turned out to be enough stuff to fill almost two of them!
Following are the instructions and pattern. I am italicizing all information that has been passed on to me.
Wonder Box Cooker Sewing Instructions
Materials Needed:
- 3 Meters (yards are 3” shorter than a meter) soft cotton or broadcloth so it will conform to the shape of the pot. (½ can be coordinated …. two colors)
- 19 scantly filled 1-gallon ice cream pails of Polystyrene beads (it is an insulation that looks like the tiny separate Styrofoam bits that make up the protective packing in electronics, etc.)
"Polystyrene is about the best insulating material and it is also easily washed. If you are only able to get the solid pieces which are used for packing radios etc., you can break it up by grating it." The booklet also says "make cushions out of large plastic bags, mutton cloth or other washable material and fill loosely with any of the following: polystyrene, dried corn husks, woolen materials, feathers, waste nylon materials, flakes of newspaper, sawdust and wood shavings, hay or other dry grasses." In Canada we have a gray 'blow in insulation' in our attic, it would be impossible to wash without opening the wonder box but it may be added to this list as well.
Sewing instructions: When you sew the wonder box together you sew 2 of the 4 pieces together along the longest sides. You open each of the pairs now and place them right sides together and sew those 2 together all the way around the outside, making an awkward shaped cushion affair. Don't forget the opening to fill through. You then repeat with the 4 bottom pieces. One pair together, sew along the longest side, then the other pair. Open them up and place them right sides together, remembering to leave openings to fill through. I am adding a loop at this point to hang this by when not in use, or dry after washing.
The narrow part of the bottom pattern is the piece you will tuck into the bigger part of the bottom to make the pouch/nest for the pot to sit into.
Hoping not to confuse the issue. If you start where the bottom pattern says 90 (degrees for the angle) and sew down the right side of the pattern and stop just after the second 11 ½ " mark, before the pattern starts back up. That will be one of the two pairs. Do the same with the other two, put right sides together again and sew it all the way around the outside edge now, into the box or ball shape. The same goes for the top cushion, start at the 100, sew down the right and stop just after the 11" mark. The rights sides together and sew again making the shape of the top cushion.
It will not lie flat. It will take the shape of a square cushion when it is filled with the polystyrene beads, and the bottom cushion has a cavity like a nest or pouch.
Top: Fill a little less than ½ full while the bag is hanging. Approximately 7 scantly filled 1-gallon ice cream pails.
A paper funnel works best, as the beads are very static prone. You may want to use an ice cream pail to pour from. Work with two people to fill—one to hold the funnel in and the other to pour. Spread a sheet on floor to catch beads.
Bottom: Cut 4 Fill approximately ½ full with polystyrene beads. Approximately 12 scantly filled 1-gallon ice cream pails
Once this bag is filled, tuck the small end into the center to form the pouch/nest for the pot. Find a good pot that works well in this pouch. No long handles please.
When the pan sits inside the pouch/nest of the bottom, the pan is surrounded on all sides except the top. So… that is where the top/lid comes in. It is very important to keep all of the heat inside this wonder box cooker. One of the pages and the recipes explain that the lid/top of the wonder box must go on immediately with no places for the heat to escape or it will all be for nothing.
For more information on this little gem, see my other posts, The Wonder Box Cooker and Wonder Box Cooker Recipes.
Labels:
DIY,
Emergency Cooking,
How Ya Gonna Cook It?
Wonder Box Cooker Recipes
Here are a few basic recipe ideas that were listed with the Wonder Box Cooker. So far the only thing I have personally done in my Wonder Box Cooker is Chili, but it was delicious, and hours after first placing it in there, it was still scalding hot, and had to cool down quite a bit before we could eat it. These little things really do work!
Try soups, stews, what ever you can bring to a boil and then give it a try. The worst that would happen is the first time, you may have to bring things back to a boil and put it back into your Wonder Box Cooker for a second cooking time.
NOTE: Never replace a pot of half eaten or luke-warm food in the Wonder Box Cooker. It should be boiled up again to prevent it going bad.
Oatmeal
2 cups quick oats
4 cups boiling water
salt, cinnamon, sugar to taste
Stir oats into boiling water, put lid on and place quickly between cushions of the W’box for 15 minutes or more. Stir before serving.
Rice
2 cups rice
Put into 3 ½ - 4 cups of salted boiling water. NB. Because the water does not evaporate you may need less water than usual.
Place quickly into W’box, and leave for 40 minutes or longer until ready to eat.
Vegetables
Potatoes or root vegetables may be cooked in their skins. Bring them to a boil in a pot full of water and place quickly between cushions of the W’box for about twice as long as you would normally cook them. They may be left all day without overcooking and can be more easily peeled after cooking.
Try waterless cooking by using the crisp kind of bags used for cooking roasts, etc. Submerge the bag into the water and bring to a boil. The bag should be left with opening protruding out from under the lid. Place quickly into Wonder Box Cooker.
Chicken and other joints of Meat
Place chicken into an Oven cooking bag with desired spices, and close bag
Bring pot of water with chicken in it, to a good boil.
Quickly place into the W’box and place top cushion on.
Leave alone for at least 3-4 hours.
The chicken was put in at 9:30 in the morning before church. This single dad prepared the chicken by placing it into an oven-cooking bag. He added spices to the chicken closed the bag completely (no added moisture was added to the bag) then brought the pot of water with the chicken in, to a boil and put it all in to the Wonder Box Cooker. We ate with him at 4:00pm. It was impressive.
Yogurt by the Gallon
4 cups dry skim milk powder
4 quarts warm water
Mix well, heat to scald, cool to luke warm
Add 1 cup of starter (plain commercial yogurt) or product saved from this finished recipe may be used to start a new batch. Refresh monthly with commercial starter.Mix well, put into a gallon glass jar with a lid and place into the Wonder Box Cooker.
Leave undisturbed for 12-14 hours. It will thicken more after refrigeration.
May be used plain or add your favorite fruits to flavor.
For those that can afford the calories, if the yogurt doesn’t set to your liking, add instant Vanilla pudding, (substituting yogurt for milk.) Can be reduced for smaller batches
Happy Homemaking!
Labels:
Emergency Cooking,
How Ya Gonna Cook It?,
Recipes
Subscribe to:
Posts (Atom)