Sometimes we get so focused on the food items we would want our family to have in an emergency situation, we fail to think about how we would use any of it without electricity, refrigeration or other of the modern conveniences we so take for granted everyday. Other times, we're not getting the most bang for our (for most of us) limited budget, because we don't have the equipment necessary to properly preserve or store the foods we would like to. In this light, I've put together a list of some of the items that I would consider essential, (or very helpful) in addressing these issues. Since we've been married, we have an ever-changing wish list of items we would like to have "someday."
Wish lists can be powerful things. Just as they say that a goal is only a wish until you write it down, a wish list, once written down, can become a roadmap towards reaching your goals. This especially applies to Family Home Storage and Preparedness. Writing down all your "wish list" items, then prioritizing them in order of importance and usefulness, then setting specific, realistic and attainable goals as to how and when you plan to acquire each item, can go a long way to making these things possible.
For us, it was as simple as creating the list, in priority, and then committing to purchase one item from the list every year. Sometimes this has been a mutual Christmas gift to each other; other times when we've had some extra or unexpected cash, we've known where we wanted to spend it. Sometimes you'll be lucky enough to "inherit" some of the items on the list. I'm always searching the local thrift stores, and once in awhile garage sales for these items. We've also been able to find deals on the internet, (an invaluable tool for pricing and researching this stuff,) on sites like amazon.com, ebay.com and through various search engines.
Following are some of the "tools" that I think could be important to any family's FHS plan. This includes stuff for home production, preservation, storage and emergency preparedness items. This should at least get you thinking. Many of these are big ticket items, but a few of them cost next to nothing and can even be made at home. I've included pictures and ballpark prices of what you can expect to pay, (from the cheapest available to top-of-the-line) as well as basic info and what each is used for. The prices would be for new, or like new items...garage sales & thrift stores are wonderful for finding amazing deals on these items, so don't forget to look there!
A Wheat Grinder/Grain Mill: $180-$300 & up
This is perhaps one of the most overlooked items that is essential to food storage. If you are LDS, you should know that in a survey done by the church, 90% of people that actually store wheat in their homes DO NOT OWN a wheat grinder. If you're storing wheat and don't have a grinder, should you find it necessary to use your food storage, you'll still be able to eat it, you'll just be limited in your options: boiled or sprouted wheat. With a wheat grinder, you'll be able to make FLOUR. And obviously, flour gives you a whole lotta options. NOTE: many are not aware that wheat has a 30+ year shelf life. When it's ground down into flour the shelf life becomes 10 years. This is the reason for storing wheat over flour, although there are practical reasons for storing both.
Most wheat grinders can also double as grain mills and can grind corn meal, rice flour, baby cereal, etc. This is an item that you will want to go for quality on. The higher end, more versatile models can grind dry grains, spices, and beans. If you're wondering what you can grind, WonderMill has set up an interesting blog called Will It Grind? that gives an extensive list as well as demonstrations for both their electric and hand models. Look into WonderMill, BlendTec and NutriMill among other brands. The WonderMill Electric Grain Mill is on my wish list for many reasons. Here is a comparison review between the two that I thought was helpful.
A Hand Wheat Grinder/Grain Mill: $70-$300 & up
A hand grinder is essential to an emergency plan in the event that there is no power. The WonderMill Junior Deluxe is on my wish list because it has no plastic parts (that will melt or break with regular, extended use) and it will grind dry grains, beans, legumes, spices, oily grains, (like flax seed or coffee) and even makes various nut butters. This hand mill also comes with a pulley that can be attached to a stationary bike...nothing like getting a good workout in while you grind your wheat!
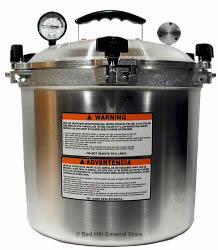
A Pressure Canner - $70-$300 & up
This piece of canning equipment is necessary to safely process low acid foods such as meats, vegetables and seafood. A pressure canner uses heat and pressure to bring the internal temperature of foods to 250 degrees or more for a specified period of time. Being able to can our own meat has saved us a lot of money, allowing us to take advantage of sales, and has greatly increased the variety of meals we can make exclusively from our food storage.
On the lower end, pressure canners have gaskets, which will need to be replaced over time. On the higher end, pressure canners have metal on metal seals. I've opted for a higher end All American Pressure Canner, since I had borrowed one for awhile and was using it frequently. We knew that we would be getting lots of use out of ours, so it was worth the investment to us. Either will do the job for you, so research and decide what makes the most sense.
A Water Bath Canner: $20-$50
A Water Bath Canner is what most people think about when they talk about "canning." It's a really large pot, with a rack inside, allowing you to lower your jars into and out of, a boiling water bath. This canning process is acceptable for fruits and tomatoes, because of their high acid content. NEVER can vegetables or meats in a water bath canner, since the temperature will not get hot enough to kill bacteria, which can lead to botulism, which can be deadly. These guidelines were changed in 1988, so recipes for meat or veggies from prior to 1988 calling for water bath canning should always be processed in a pressure canner for the appropriate amount of time. Time tables are readily available online. In my experience most water bath canners are very similar, so go for the best deal you can find. Be sure to check out garage sales and thrift shops, since there are many people who get these and then never use them. Don't worry...with your self-sufficiency mindset, you'll be getting plenty of use out of it!
A Vacuum Sealer w/port, tubing & jar sealer attachments: $40-$175
A vacuum sealer is a great appliance for helping to effectively store all your dry foodstuffs. With the tube and jar sealer attachments, (both regular and wide mouth) you can vacuum seal mason jars, extending the life of your dry goods by up to five times. Nuts, raisins, chocolate chips, chow mein noodles, dehydrated fruits and veggies, brown rice and other items particularly sensitive to spoilage in your short-term pantry supplies are perfect for this. NOTE: a vacuum sealer does not replace heat canning or refrigeration for preserving food. It is a suitable means of extending the shelf-life of already shelf-stable dry goods, ONLY. The model pictured is quite a slick, stainless steel, newer model. An older model in white or ecru will also work just as well. Be sure to check garage sales and thrift stores. I've found two food savers in the last month at our local DI thrift store for $5 a piece.
The main thing you're looking for in a food saver is that it has an accessories port, which you can hook a tube into. This is because you'll want to also get the tubing and mason jar sealers, pictured here (I would recommend getting both the regular and wide-mouth sizes) so you have the capability of sealing your jars. The jar sealer attachments can be found on amazon.com or ebay.com for about $6-$10 each. I wouldn't pay over $10.
A Food Dehydrator: $90-$350
Be careful in selecting one of these, as the old adage really applies here: you get what you pay for! Make sure you find one that has a fan, not just a heating element, and preferably a temperature gauge. Drying your foods at temps no less than 100*F and no more than 125*F will ensure you maintain the highest content of vitamins, nutrients and enzymes. A quality mandolin, or electric meat slicer will assist you in slicing fruits and veggies more quickly (which is always nice,) but more importantly more evenly, ensuring a more even drying time, (your entire batch should be done around the same time) and also a prettier finished product. Who doesn't like pretty things? I aspire to an Excalibur, by most accounts to be the Cadillac of the dehydrating world. For right now, we found an eight tray GardenMaster by Nesco on Amazon for $93 including shipping. It is working wonderfully well for all my projects, and was much more in our price range for this stage in our lives. The Excalibur will do more, a bit more conveniently and quickly, so eventually I would like to get one. The GardenMaster has a fan and a temperature control, and we've been very happy with it.
A Solar Oven: $229 - $400
We just took our Solar Oven out for it's maiden voyage at a week-long camping trip, and we FELL. IN. LOVE. It works AMAZINGLY well, and heated to 350* all on the simple power provided by the sun. We baked fresh, warm, lovely brownies, coffee cake, and blueberry shortcake out in the middle of the forest. The solar oven will also bake bread, cook a turkey, pasteurize water and bake, cook, steam or boil anything else you would cook in your oven at home. We have a Global Sun Oven, because they got the best reviews of the ones we researched. The company now has a newer model, released in March 2013, called the All American Sun Oven, which has a few more bells-and-whistles and is supposed to be able to get even hotter, (between 360*-400*F.) If we were buying one now, this would be the model we would get. It is a big ticket item at $345, but keep your eyes peeled for a deal...be aware that there will be a price for having the newest model. We got our oven with the "Preparedness & Dehydrating" package, which includes all the racks, pots and pans at Christmastime for less than $250. It's also the older model, but if you're willing to put up with a dinosaur to save $100 bucks, the Global Sun Oven gets high reviews from us and lots of others!
We have small children as well as dogs, so I was nervous about how hot it would get. The actual outside surface of the box and the wood edge (on the outside of the reflectors) never even got warm to the touch. The glass door (inside the reflectors) and the inside of the oven got very hot...350 degrees hot...it IS a real oven, so you'll want to be sure to also pack your oven mitts! My husband learned this the hard way, and as we both laughed, he quipped about it being hard to take a little box seriously as a real oven, until you touch it. :) The external surface of the box is fully insulated so it removed any worry I had of the kids accidentally bumping up against it. The oven door latches completely closed, and is sealed by a rubber gasket, so while the dogs loved their warm naps right next to it, (it was always in the sunniest spot in our camp) they never tried to disturb it in anyway.
A Wonder Box Cooker: DIY for around $20 - $30
The Wonder Box Cooker is an amazing little contraption that utilizes insulation as a means for conserving fuel, and cooking food by maintaining the heat for an extended period of time. The general method is to use your fuel to bring your food to a boil, then transfer it into the cooker, where it maintains it's temperature and continues to finish cooking using no fuel at all! It takes a few yards of fabric, access to a sewing machine, minimal sewing skills and stuffing. You can find a tutorial, additional information and recipes here.
A Rocket Stove: DIY for FREE!
This is another amazing invention that utilizes proper airflow and ventilation to cook foods with minimal fuel at maximum efficiency. You can make one yourself using a #10 can, (like a large coffee can or LDS cannery can) and four other smaller soup cans, along with some sand. You'll need tin snips and a sturdy pair of gloves. This stove will cook HOT on only a handful of very small twigs at a time. You can find tutorials online and on YouTube, and I found this video, along with the follow-up videos extremely helpful: Build a Rocket Stove, Step-by-Step.
A Double Burner Propane Camp Stove: $85 - $150
This is a must for canning in the summer time, in my opinion. Then all that lovely heat can stay outside and doesn't have to congregate inside my home! Also great for avid campers, (like us,) and for obvious reasons, this would be handy to have in the event of an emergency.
Showing posts with label Emergency Preparedness. Show all posts
Friday, May 31, 2013
Thursday, May 30, 2013
Camping Essentials in a Bin
Today's post is going to be off the beaten path, just a bit. I LOVE camping, and I have my whole life. I love getting out into nature, away from the noise, hustle and bustle of life in our modern world. We just completed our first camping trip of the season...and I was reminded again how much I absolutely love camping! I know not everyone shares my enthusiasm for the great outdoors. That makes me sad, because I feel like there are so many wonderful benefits of "getting out there." In my opinion, many of the difficulties or reasons that people that love the outdoors don't also love camping are caused by one of two things: 1) lack of proper equipment & supplies or 2) lack of proper preparation, both before and during a camping trip. Not having what you need when you need it can make anything miserable.
One way that has made it extremely easy for my husband and I to go camping, is to keep our gear organized and together all in one place. We have a large, heavy duty set of deep shelves (as deep as a plastic bin is long) that we got from Home Depot for about $40, where we keep everything together in our garage. The bottom shelf holds our 72 hour kits, which we never get into. All our other camping gear is on the top four shelves, and the beauty of camping gear is that it would all double as emergency prep stuff. We have a "Camping Essentials" bin on one of the shelves, which holds all of our basic stuff. Everything that needs to go into the car is all in one place and ready to go. The only things we need to pack for a camping trip are our clothes, and our food. That can still be quite a job, especially if you have kids, but having everything else together and accessible will go a long way to shortening the process. I'm including a list of what we've got in our bin, and it looks like a long list, but most of it really will fit into just one bin. If it doesn't, just label a second bin. If you're going to be taking it and needing to use it, it's better to have it packed and ready anyway.
Camping Essentials:
matches in ziplock or other water proof container
lighter fluid
fire starters
long handled bic lighter or two
Flashlights w/ extra batteries
Camp Hatchet (for firewood, etc.)
Good quality outdoor knife (for whittling wood, etc.)
Whet Stone for sharpening knife
Camp shovel (for burying things, digging up rocks, etc.)
Rope w/ Clothespins for drying clothes, dishcloths, towels, etc.
Bungee Cords (3-4 in different sizes)
Sunscreen SPF 30+
Playing cards/card game or two
Spool of Twine
Pen & Small Notebook or Pad of Paper
Scissors
Duct Tape
Small Bottle of Tylenol, Advil, Benadryl (I mix them, but you're not supposed to do this)
Small First Aid Kit or at least Box of BandAids
Insect Repellant
Insect Repellant for Gear (I spray around base of our tent once it's set up)
Cooking/Eating Essentials:
Heavy duty vinyl tablecloth w/ clips (for picnic table)
Dishes (sturdy plastic plates, bowls, cups, etc.)
Silverware
Long Handled Tongs
Metal Spatula
Rubber Scraping Spatula
Wooden Spoon
Good, Sharp Kitchen Knife or two
Heavy Frying Pan
Kettle for boiling water
Sauce Pan w/ lid
Can Opener
Bottle Opener w/punch feature
Cutting Board or two
Hot Pads
Silicone Oven Mitts
Kitchen Timer
Measuring Cups
Measuring Spoons
Plastic Mixing Bowl
Roasting Sticks for marshmallows
Small Bottle of cooking oil
Disposable Salt & Pepper Shakers
roll of Aluminum Foil
roll of Saran Wrap
zip lock bags in quart/gallon sizes (for leftovers, etc.)
Cleaning/Sanitation:
dish pan
dish drainer
dunk bag (for sanitizing dishes)
dish soap
dish brush
extra sponges
dish cloths
dish/hand towels
small ziplock of SOS pads
hand soap
hand sanitizer
paper towels
napkins
package of baby wipes
tub of lysol wipes for wiping table, camp stove, etc.
extra roll of TP
a few large black trash bags
roll of kitchen trash bags
Paper/Disposable Products: (optional, but easier than washing dishes)
plates
bowls
cups
utensils
The bins can double as little tables while you're camping, and are also great because you can just pack everything up at night, put the lid on and slide under the picnic or camp table...it keeps everything dry from morning dew and away from insects & all but the most determined critters. NOTE: I never keep food of any kind in my bins, since I don't want to attract critters, now or in the future. Smells created by food can be obvious to animals much longer than they are to humans. We keep all food and food items in boxes in our car while not in use when we are car camping. These rules apply especially when you are camping more remotely, or in areas with large game animals such as elk, deer or moose, and especially in areas known as bear country. Obviously, in any camping situation, you should NEVER have cooked food or food/snack items in your tent, and NEVER sleep in the same clothes you cooked meals in. Store all cooking utensils and other supplies away from your tents/sleeping areas and keep all trash and food items in your car or other bear-proof designated containers. Ok. Bear safety minute is over.
I also LOVE the big blue reusable IKEA bags (that are like .50 cents each at the IKEA check out counters) for holding things like tents, tarps, sleeping bags and other large stuff. Keeps it really organized and easy to grab, pack, etc.
Other Standard & Not-So-Standard Camping Gear:
Tent
Sleeping bags
Ground Insulation Pads
2-3 tarps (one for underneath tent, misc. sizes for other uses)
Camp Stove & bottle of propane (our stove is a little one-burner so it fits in our bin)
Camp Lantern, propane, extra mantles
Case for lantern, if desired
Large stock pot (for heating/boiling water)
folding 4' table
folding camp chairs
water container w/spigot (like a Gott) for drinking, hand washing
large cooler
dutch oven
solar oven (which I use to store some of our camp kitchen stuff)
*Comfort items for Sleeping:
4" foam pad, air mattress or other pad for comfort
down feather bed & comforter (I get cold easily)
set of sheets w/pillow cases
set of pillows
*We keep all of these items in a large space bag. They are exclusively devoted to camping, so they also stay on our shelf in the garage.
Having "exclusively-devoted-to-camping" items will also help simplify your life. Instead of having to remember to pack all your kitchen needs along with all your food, having a can opener & cutting board whose sole responsibility is to sit in your camping bin at your beck and call, will totally simplify your life, trust me! Also, you won't have to worry about partially melting the handle of your favorite spatula on the gas stove, or blacking the bottom of your nicest kitchen pot if you've got one just for camping. In addition to having a bin, having designated camping items is one of my most important rules for simplifying the pre-camping-prep process.
Of course, don't forget to bring firewood, charcoal briquettes and water or a water filter (if you're camping in an area without running water.) Also, don't forget the makings for S'mores, your family's favorite campfire treats, and maybe a thing of Jiffy Pop to pop over the campfire also!
We had a wonderful week of primitive camping where we ate amazing food, practiced with all our camping/outdoor/emergency prep gadgets, and got away from all the craziness of everyday life. If you've ever wondered how your family would do in the event of an emergency, primitive camping is a great way to see. It's a great way to test your preparedness skills and supplies. Our campground was supposed to have running water via pump spigots & pit toilets. Not much in the way of frills or comforts to begin with. But when we arrived, because we were the first campers of the season, the forest service had not yet been there, the water was not yet on, and the outhouses were locked. Good thing that we had our little backpacking water filter, a creek that ran right through our campsite and an extra roll of TP. It was fun to see that we could be totally self-sufficient and comfortable at the same time. I'll post more about the solar oven later, since it was A-Mazing...and we totally fell in love with it.
For now, I hope this list helps and gets your mind working on how you can organize your camping gear and supplies to make things more comfortable, easier to grab-and-go, and as an efficient double for your family's emergency supplies.
One way that has made it extremely easy for my husband and I to go camping, is to keep our gear organized and together all in one place. We have a large, heavy duty set of deep shelves (as deep as a plastic bin is long) that we got from Home Depot for about $40, where we keep everything together in our garage. The bottom shelf holds our 72 hour kits, which we never get into. All our other camping gear is on the top four shelves, and the beauty of camping gear is that it would all double as emergency prep stuff. We have a "Camping Essentials" bin on one of the shelves, which holds all of our basic stuff. Everything that needs to go into the car is all in one place and ready to go. The only things we need to pack for a camping trip are our clothes, and our food. That can still be quite a job, especially if you have kids, but having everything else together and accessible will go a long way to shortening the process. I'm including a list of what we've got in our bin, and it looks like a long list, but most of it really will fit into just one bin. If it doesn't, just label a second bin. If you're going to be taking it and needing to use it, it's better to have it packed and ready anyway.
| Here our little bin is all packed and waiting for its next adventure! |
Camping Essentials:
matches in ziplock or other water proof container
lighter fluid
fire starters
long handled bic lighter or two
Flashlights w/ extra batteries
Camp Hatchet (for firewood, etc.)
Good quality outdoor knife (for whittling wood, etc.)
Whet Stone for sharpening knife
Camp shovel (for burying things, digging up rocks, etc.)
Rope w/ Clothespins for drying clothes, dishcloths, towels, etc.
Bungee Cords (3-4 in different sizes)
Sunscreen SPF 30+
Playing cards/card game or two
Spool of Twine
Pen & Small Notebook or Pad of Paper
Scissors
Duct Tape
Small Bottle of Tylenol, Advil, Benadryl (I mix them, but you're not supposed to do this)
Small First Aid Kit or at least Box of BandAids
Insect Repellant
Insect Repellant for Gear (I spray around base of our tent once it's set up)
Cooking/Eating Essentials:
Heavy duty vinyl tablecloth w/ clips (for picnic table)
Dishes (sturdy plastic plates, bowls, cups, etc.)
Silverware
Long Handled Tongs
Metal Spatula
Rubber Scraping Spatula
Wooden Spoon
Good, Sharp Kitchen Knife or two
Heavy Frying Pan
Kettle for boiling water
Sauce Pan w/ lid
Can Opener
Bottle Opener w/punch feature
Cutting Board or two
Hot Pads
Silicone Oven Mitts
Kitchen Timer
Measuring Cups
Measuring Spoons
Plastic Mixing Bowl
Roasting Sticks for marshmallows
Small Bottle of cooking oil
Disposable Salt & Pepper Shakers
roll of Aluminum Foil
roll of Saran Wrap
zip lock bags in quart/gallon sizes (for leftovers, etc.)
Cleaning/Sanitation:
dish pan
dish drainer
dunk bag (for sanitizing dishes)
dish soap
dish brush
extra sponges
dish cloths
dish/hand towels
small ziplock of SOS pads
hand soap
hand sanitizer
paper towels
napkins
package of baby wipes
tub of lysol wipes for wiping table, camp stove, etc.
extra roll of TP
a few large black trash bags
roll of kitchen trash bags
Paper/Disposable Products: (optional, but easier than washing dishes)
plates
bowls
cups
utensils
The bins can double as little tables while you're camping, and are also great because you can just pack everything up at night, put the lid on and slide under the picnic or camp table...it keeps everything dry from morning dew and away from insects & all but the most determined critters. NOTE: I never keep food of any kind in my bins, since I don't want to attract critters, now or in the future. Smells created by food can be obvious to animals much longer than they are to humans. We keep all food and food items in boxes in our car while not in use when we are car camping. These rules apply especially when you are camping more remotely, or in areas with large game animals such as elk, deer or moose, and especially in areas known as bear country. Obviously, in any camping situation, you should NEVER have cooked food or food/snack items in your tent, and NEVER sleep in the same clothes you cooked meals in. Store all cooking utensils and other supplies away from your tents/sleeping areas and keep all trash and food items in your car or other bear-proof designated containers. Ok. Bear safety minute is over.
I also LOVE the big blue reusable IKEA bags (that are like .50 cents each at the IKEA check out counters) for holding things like tents, tarps, sleeping bags and other large stuff. Keeps it really organized and easy to grab, pack, etc.
Other Standard & Not-So-Standard Camping Gear:
Tent
Sleeping bags
Ground Insulation Pads
2-3 tarps (one for underneath tent, misc. sizes for other uses)
Camp Stove & bottle of propane (our stove is a little one-burner so it fits in our bin)
Camp Lantern, propane, extra mantles
Case for lantern, if desired
Large stock pot (for heating/boiling water)
folding 4' table
folding camp chairs
water container w/spigot (like a Gott) for drinking, hand washing
large cooler
dutch oven
solar oven (which I use to store some of our camp kitchen stuff)
*Comfort items for Sleeping:
4" foam pad, air mattress or other pad for comfort
down feather bed & comforter (I get cold easily)
set of sheets w/pillow cases
set of pillows
*We keep all of these items in a large space bag. They are exclusively devoted to camping, so they also stay on our shelf in the garage.
Having "exclusively-devoted-to-camping" items will also help simplify your life. Instead of having to remember to pack all your kitchen needs along with all your food, having a can opener & cutting board whose sole responsibility is to sit in your camping bin at your beck and call, will totally simplify your life, trust me! Also, you won't have to worry about partially melting the handle of your favorite spatula on the gas stove, or blacking the bottom of your nicest kitchen pot if you've got one just for camping. In addition to having a bin, having designated camping items is one of my most important rules for simplifying the pre-camping-prep process.
Of course, don't forget to bring firewood, charcoal briquettes and water or a water filter (if you're camping in an area without running water.) Also, don't forget the makings for S'mores, your family's favorite campfire treats, and maybe a thing of Jiffy Pop to pop over the campfire also!
We had a wonderful week of primitive camping where we ate amazing food, practiced with all our camping/outdoor/emergency prep gadgets, and got away from all the craziness of everyday life. If you've ever wondered how your family would do in the event of an emergency, primitive camping is a great way to see. It's a great way to test your preparedness skills and supplies. Our campground was supposed to have running water via pump spigots & pit toilets. Not much in the way of frills or comforts to begin with. But when we arrived, because we were the first campers of the season, the forest service had not yet been there, the water was not yet on, and the outhouses were locked. Good thing that we had our little backpacking water filter, a creek that ran right through our campsite and an extra roll of TP. It was fun to see that we could be totally self-sufficient and comfortable at the same time. I'll post more about the solar oven later, since it was A-Mazing...and we totally fell in love with it.
For now, I hope this list helps and gets your mind working on how you can organize your camping gear and supplies to make things more comfortable, easier to grab-and-go, and as an efficient double for your family's emergency supplies.
Tuesday, May 7, 2013
An Emergency Water Option
Because my husband is in graduate school, we are in a very transient stage of life. We are currently renting a very small home, with no yard. This has put a bit of a cramp in our emergency preparedness style. We've been able to work around most of the challenges, since preparedness is a priority to us. But the one thing that has been extremely difficult for us right now is water storage.
The primary method for storing emergency water is the large, blue 55-gallon drums or barrels which can be purchased almost anywhere, including even WalMart these days. Eventually, we'll invest in the big blue barrels - we also have other ideas we'd like to try. But with renting a home, it makes it a little scary to have huge containers of water sitting around. If they happened to spring a leak, we'd be responsible for the damage. Additionally, with two major moves in the same amount of years, 55-gallon drums are pretty big, and even when they're empty, would take up a lot of our truck space. I don't know that we want to deal with all that just yet. However, water storage is essential to any family's emergency preparedness plan. For now, we have about three week's worth of drinking water stored for our family. This is one area of our plan where I think we're abysmally weak. And it's something I worry about.
In some of my preparedness travels, I came across an item called a Water BOB and I thought it could go a long ways to solving part of our problem. It's a bladder that you can fill up in your bathtub in the event of an impending storm or other problem. This would be perfect in an area prone to hurricanes, or other frequent storms. The major drawback of course, is that in order to successfully use this, you would require some advance warning of a problem. There are so many emergencies that could arise where you wouldn't have that notice. Still, for the many situations where you would have notice, these things would come in handy. Here's a video review I found on YouTube:
I liked this video because it's the whole process from beginning to end. The plastic is food grade, and will hold the drinking water for up to four weeks. I haven't yet been able to find information on how long I can store it (on the shelf) and still have it be pliable (since most plastics become brittle over time) when I eventually pulled it out to use it. I'll update if I can find that info. Even with it's limitations, I think the WaterBob is a worth-while investment for any family's preparedness shelves.
The primary method for storing emergency water is the large, blue 55-gallon drums or barrels which can be purchased almost anywhere, including even WalMart these days. Eventually, we'll invest in the big blue barrels - we also have other ideas we'd like to try. But with renting a home, it makes it a little scary to have huge containers of water sitting around. If they happened to spring a leak, we'd be responsible for the damage. Additionally, with two major moves in the same amount of years, 55-gallon drums are pretty big, and even when they're empty, would take up a lot of our truck space. I don't know that we want to deal with all that just yet. However, water storage is essential to any family's emergency preparedness plan. For now, we have about three week's worth of drinking water stored for our family. This is one area of our plan where I think we're abysmally weak. And it's something I worry about.
In some of my preparedness travels, I came across an item called a Water BOB and I thought it could go a long ways to solving part of our problem. It's a bladder that you can fill up in your bathtub in the event of an impending storm or other problem. This would be perfect in an area prone to hurricanes, or other frequent storms. The major drawback of course, is that in order to successfully use this, you would require some advance warning of a problem. There are so many emergencies that could arise where you wouldn't have that notice. Still, for the many situations where you would have notice, these things would come in handy. Here's a video review I found on YouTube:
I liked this video because it's the whole process from beginning to end. The plastic is food grade, and will hold the drinking water for up to four weeks. I haven't yet been able to find information on how long I can store it (on the shelf) and still have it be pliable (since most plastics become brittle over time) when I eventually pulled it out to use it. I'll update if I can find that info. Even with it's limitations, I think the WaterBob is a worth-while investment for any family's preparedness shelves.
Sunday, May 5, 2013
Supplies for Your 72 Hour Kits
Where Do I Get Supplies for Our Emergency Kits? It's a great question, and one that many people ask as they start on the road to self reliance and emergency preparedness. Spend a little time researching, but remember that in today's world of online shopping, we literally have the world at our finger tips. Because we are a young family and on a limited budget, I have found that shopping around and being selective, prioritizing our needs and then making the best purchases possible, are all things that have really helped us stretch our emergency preparedness budget.
You can get most of the supplies at WalMart, K-Mart, Target, Home Depot or other type store. Outdoor and Sporting Goods stores are also a great resource, but watch the prices. A lot of the smaller supplies are even available at the dollar store. If you’re preparing kits for several people and don’t have unlimited amounts of cash, it will save you a lot of money to do a little shopping around.
For specialty emergency items that you can’t find other places, Emergency Essentials has many supplies for this specific purpose. They can be found online at www.beprepared.com or you can call them at 1-800-999-1863. Doing a quick internet search for emergency supplies will also produce many results and allow you to shop and compare prices as well.
I am an admitted cheap skate, and my husband is even worse. The following supplies are examples of the ones we found at our local Dollar Tree store:
Box of 10 Earloop Masks
Box of 100 assorted bandaids
Roll of 2” Gauze
Roll of 3” Gauze
Roll of 4” Gauze
Second Skin
Instant Ice Pack
Tube of antibiotic ointment
Package of 2 emergency ponchos
Set of Phillips & flathead screwdrivers
Roll of (420ft.) cotton twine
Box of 12 particulate masks
Super Glue
We have gotten many more items at the dollar store, but be careful to be selective. There is a delicate balance between which items can be “disposable” or limited-use quality, and which items need to be very durable and high quality. Keep in mind that your 72-hour kit is designed for a three day period where you might have to leave your home, but where you’ll eventually (with any luck) be able to go back. Many items can be temporary. The items that I would not cut corners on would include a good knife/pocket knife/multipurpose tool, batteries, a sturdy pair of shoes, a P-38 can opener or any other item that will be used constantly if you ever have to pull out your packs.
A lot of the small items are for different contingencies and scenarios, and may never actually be needed. The screwdrivers that we found at the dollar store are sturdy enough to be used in a pinch, but they’re not what my husband would want to use all the time. One last word to the wise: I love the dollar store, but some of the items are totally worthless. Before “stocking up” on something, I always make sure to open one up and make sure it will actually work for what I need.
Also, we have stocked our family first aid kit at the dollar store. Gauze, band aids & ice packs are all items that are more than three times the cost at other stores, and they are the same product! There are plenty of first aid items you’ll want in your kit that will be expensive. Save your pennies where you can.
You can get most of the supplies at WalMart, K-Mart, Target, Home Depot or other type store. Outdoor and Sporting Goods stores are also a great resource, but watch the prices. A lot of the smaller supplies are even available at the dollar store. If you’re preparing kits for several people and don’t have unlimited amounts of cash, it will save you a lot of money to do a little shopping around.
For specialty emergency items that you can’t find other places, Emergency Essentials has many supplies for this specific purpose. They can be found online at www.beprepared.com or you can call them at 1-800-999-1863. Doing a quick internet search for emergency supplies will also produce many results and allow you to shop and compare prices as well.
I am an admitted cheap skate, and my husband is even worse. The following supplies are examples of the ones we found at our local Dollar Tree store:
Box of 10 Earloop Masks
Box of 100 assorted bandaids
Roll of 2” Gauze
Roll of 3” Gauze
Roll of 4” Gauze
Second Skin
Instant Ice Pack
Tube of antibiotic ointment
Package of 2 emergency ponchos
Set of Phillips & flathead screwdrivers
Roll of (420ft.) cotton twine
Box of 12 particulate masks
Super Glue
We have gotten many more items at the dollar store, but be careful to be selective. There is a delicate balance between which items can be “disposable” or limited-use quality, and which items need to be very durable and high quality. Keep in mind that your 72-hour kit is designed for a three day period where you might have to leave your home, but where you’ll eventually (with any luck) be able to go back. Many items can be temporary. The items that I would not cut corners on would include a good knife/pocket knife/multipurpose tool, batteries, a sturdy pair of shoes, a P-38 can opener or any other item that will be used constantly if you ever have to pull out your packs.
A lot of the small items are for different contingencies and scenarios, and may never actually be needed. The screwdrivers that we found at the dollar store are sturdy enough to be used in a pinch, but they’re not what my husband would want to use all the time. One last word to the wise: I love the dollar store, but some of the items are totally worthless. Before “stocking up” on something, I always make sure to open one up and make sure it will actually work for what I need.
Also, we have stocked our family first aid kit at the dollar store. Gauze, band aids & ice packs are all items that are more than three times the cost at other stores, and they are the same product! There are plenty of first aid items you’ll want in your kit that will be expensive. Save your pennies where you can.
Are You Prepared?
Some Scenarios to Think About and Reasons to DO IT NOW:
1. Your next-door neighbors are adding on to their house. A sudden explosion caused by the new gas lines sets the house on fire. The fire department arrives and within minutes you are told that you have to gather what you need and leave your home, as there is a chance it may catch fire. You have 3-5 minutes.
2. A major earthquake has either leveled or severely damaged most of the homes in your neighborhood & surrounding community. There are many injuries, and what is left of people’s homes is unfit for shelter.
3. A sudden windstorm causes wide-spread power outages. You listen to the radio in your car, and hear that because of the number of people without power, it may take crews up to three days to restore power to your area.
4. Because of heavy rains and flooding over the past week, officials have been keeping a close eye on the dam just up river from your community. There is an announcement on the emergency broadcasting system that the dam has broken and certain areas have to be evacuated immediately. You are in an area requiring immediate evacuation. You have 1-2 minutes to get out.
5. On the way home from a weekend trip, you get a speeding ticket for over $300, more than next month’s grocery and spending money allotment, combined. If you pay your ticket, you won’t have any money for groceries or other supplies.
6. You live in an ocean side community in the south. A tropical storm has just been recently upgraded to a hurricane. You have been out shopping most of the day, and have only just returned home. You suddenly hear a loud speaker outside and go out to see a police car driving down your street announcing that you must leave your home in the next 15 minutes. The evacuation is for an indefinite period of time.
7. A particularly bad snow storm leaves you home-bound and without power, heat or running water for over a week.
8. Because of local civil unrest, extreme riots have broken out in various areas of the city in which you live. You are uneasy about your family staying in your home during this time.
9. An unexpected illness causes you to miss two weeks of work, unpaid.
10. A national trucker’s union goes on strike, causing shortages on basic necessities at most major grocery stores.
1. Your next-door neighbors are adding on to their house. A sudden explosion caused by the new gas lines sets the house on fire. The fire department arrives and within minutes you are told that you have to gather what you need and leave your home, as there is a chance it may catch fire. You have 3-5 minutes.
2. A major earthquake has either leveled or severely damaged most of the homes in your neighborhood & surrounding community. There are many injuries, and what is left of people’s homes is unfit for shelter.
3. A sudden windstorm causes wide-spread power outages. You listen to the radio in your car, and hear that because of the number of people without power, it may take crews up to three days to restore power to your area.
4. Because of heavy rains and flooding over the past week, officials have been keeping a close eye on the dam just up river from your community. There is an announcement on the emergency broadcasting system that the dam has broken and certain areas have to be evacuated immediately. You are in an area requiring immediate evacuation. You have 1-2 minutes to get out.
5. On the way home from a weekend trip, you get a speeding ticket for over $300, more than next month’s grocery and spending money allotment, combined. If you pay your ticket, you won’t have any money for groceries or other supplies.
6. You live in an ocean side community in the south. A tropical storm has just been recently upgraded to a hurricane. You have been out shopping most of the day, and have only just returned home. You suddenly hear a loud speaker outside and go out to see a police car driving down your street announcing that you must leave your home in the next 15 minutes. The evacuation is for an indefinite period of time.
7. A particularly bad snow storm leaves you home-bound and without power, heat or running water for over a week.
8. Because of local civil unrest, extreme riots have broken out in various areas of the city in which you live. You are uneasy about your family staying in your home during this time.
9. An unexpected illness causes you to miss two weeks of work, unpaid.
10. A national trucker’s union goes on strike, causing shortages on basic necessities at most major grocery stores.
72 Hour Kits for Infants
As a parent, it is your first and foremost obligation to take care of your child. Can you imagine being in a situation where you are not able to do that? Can you imagine how you would feel arriving at that moment and knowing that with a bit of foresight and planning you could have helped your child avoid this situation? Take a few minutes to provide your baby with a bit of insurance against that situation. As you put your kit together, keep in mind that this is a general list- You know your child & their needs. Tailor this list to what you know YOUR baby would need during an emergency situation.
Experts suggest checking and updating your packs every six months. I packed our baby pack for up to one year a head of time. Clothes that are too big can be made to work...clothes that are too small are worthless. I packed 12mo. sizes for our brand new baby. The same goes for diapers. In an emergency, duct tape could work miracles with a diaper that is too big. You don't want to deal with diapers that are too small. If you breastfeed, realize that your milk may dry up during stressful situations. Keep formula & bottles on hand for this contingency. Include baby foods - even if your baby isn't eating them yet. Try to include a variety so your baby will have a well-rounded diet in the event of a problem.
Along with our baby's backpack, I purchased a cloth baby carrier at a garage sale...if we needed to leave our home on foot, our plan is that I will carry the baby in the front pack, with his backpack on my back. My kit is in a rolling bag, so I can pull it. Put some time into thinking about how you would transport your baby & their kit if you are on foot. 72 hour kits MUST BE PORTABLE. You don't need to spend a lot of money to do this. Check garage sales, thrift stores and resale shops for deals on bags & baby carriers. Chances are you've got an extra bag or two that would work just fine for now. Begin today. Don't wait!
Water, Drinking & Other
Water, 2-liter bottle
Drinking Water Pouches, 4oz.
Food Pack
Powdered Baby Formula
Liquid Baby Formula
Rice or other Cereal
Dry Cereal, Snack (cheerios)
3-6 packs of fruit/veggie/meat baby food
Baby Bowl w/lid
Baby Spoon
Papertowels
Anti-bac Wipes
3 8 oz. Bottles w/caps (filled with purified water)
8 oz. Bottle Liners (enough for 3 days)
3 Extra Bottle Nipples
Cooking/Sanitation
Small Folding Stove
Stove Fuel, 1 can
Waterproof Matches
Anti-bac Wipes
Hand Sanitizer
Bottle Brush
Dish Soap
zip-lock bags
2-3 small garbage bags
Clothing
1 Small, Heavy, Warm Blanket
2 Dbl Sided Receiving Blankets
Snow Suit
Onesies (T-shirt)
Rompers
Sweatshirt
Sun Hat
Stocking Cap
6 pr. Socks
3-4 Cloth Bibs
Snap-up Pajamas
Toiletries
24 Disposable Diapers
3-4 Cloth Diapers & Rubber Pants
Baby Wipes
Diaper Pins
Baby Shampoo
Baby Lotion
Baby Powder
Hand Soap
Q-tips
Towel
Washcloth
Comfort Items
Comfort Blankie
Small Stuffed Toy
Pacifier
Pacifier Clip
Teething Ring
Small Toys
First Aid
Sunscreen SPF 30
Insect Repellent
Band Aids
Baby Aspirin
Baby Motrin
Teething Gel
Baby Benedryl
Baby Thermometer
Safety Pins
Nose Bulb
Emergency Supplies
Emergency Blanket, Mylar
Hand Warmers
Small flashlight
Batteries, AA
Whistle
Important Documents
Copy of Birth Certificate
Copies of Parent's ID (driver's license, etc.)
Copy of Immunization Record
Copy of Insurance Cards
Insurance Contact & Policy Info
Experts suggest checking and updating your packs every six months. I packed our baby pack for up to one year a head of time. Clothes that are too big can be made to work...clothes that are too small are worthless. I packed 12mo. sizes for our brand new baby. The same goes for diapers. In an emergency, duct tape could work miracles with a diaper that is too big. You don't want to deal with diapers that are too small. If you breastfeed, realize that your milk may dry up during stressful situations. Keep formula & bottles on hand for this contingency. Include baby foods - even if your baby isn't eating them yet. Try to include a variety so your baby will have a well-rounded diet in the event of a problem.
Along with our baby's backpack, I purchased a cloth baby carrier at a garage sale...if we needed to leave our home on foot, our plan is that I will carry the baby in the front pack, with his backpack on my back. My kit is in a rolling bag, so I can pull it. Put some time into thinking about how you would transport your baby & their kit if you are on foot. 72 hour kits MUST BE PORTABLE. You don't need to spend a lot of money to do this. Check garage sales, thrift stores and resale shops for deals on bags & baby carriers. Chances are you've got an extra bag or two that would work just fine for now. Begin today. Don't wait!
Water, Drinking & Other
Water, 2-liter bottle
Drinking Water Pouches, 4oz.
Food Pack
Powdered Baby Formula
Liquid Baby Formula
Rice or other Cereal
Dry Cereal, Snack (cheerios)
3-6 packs of fruit/veggie/meat baby food
Baby Bowl w/lid
Baby Spoon
Papertowels
Anti-bac Wipes
3 8 oz. Bottles w/caps (filled with purified water)
8 oz. Bottle Liners (enough for 3 days)
3 Extra Bottle Nipples
Cooking/Sanitation
Small Folding Stove
Stove Fuel, 1 can
Waterproof Matches
Anti-bac Wipes
Hand Sanitizer
Bottle Brush
Dish Soap
zip-lock bags
2-3 small garbage bags
Clothing
1 Small, Heavy, Warm Blanket
2 Dbl Sided Receiving Blankets
Snow Suit
Onesies (T-shirt)
Rompers
Sweatshirt
Sun Hat
Stocking Cap
6 pr. Socks
3-4 Cloth Bibs
Snap-up Pajamas
Toiletries
24 Disposable Diapers
3-4 Cloth Diapers & Rubber Pants
Baby Wipes
Diaper Pins
Baby Shampoo
Baby Lotion
Baby Powder
Hand Soap
Q-tips
Towel
Washcloth
Comfort Items
Comfort Blankie
Small Stuffed Toy
Pacifier
Pacifier Clip
Teething Ring
Small Toys
First Aid
Sunscreen SPF 30
Insect Repellent
Band Aids
Baby Aspirin
Baby Motrin
Teething Gel
Baby Benedryl
Baby Thermometer
Safety Pins
Nose Bulb
Emergency Supplies
Emergency Blanket, Mylar
Hand Warmers
Small flashlight
Batteries, AA
Whistle
Important Documents
Copy of Birth Certificate
Copies of Parent's ID (driver's license, etc.)
Copy of Immunization Record
Copy of Insurance Cards
Insurance Contact & Policy Info
Labels:
72 Hour Kits,
Emergency Preparedness,
Evacuating
Creating An Evacuation Grab List
Sit down for a minute and imagine a horrible scenario. You
have 10 minutes to leave your house, and you aren’t sure if it is going to be
there when you come back. You can take your kids, your emergency kits and
anything else you can fit in your car. What would you grab? What items do you
consider absolutely irreplaceable? The Family Bible, Priceless Photographs,
your great-grandmother’s lace tablecloth? It’s something that most of us never
want to think about, but a few minutes of preparation will help you to avoid
possibly losing irreplaceable items that are portable enough to take with you
in the event of an evacuation.
As you think about what you would grab, sit down and list all of those items. While it may be difficult, try to list them according to priority, so that if
time is limited, you can grab the most important first. Keep a copy of this
list in your 72-Hour kit where you can easily look at it in the event of an
evacuation. In a stressful situation, it may be difficult to think clearly
about what you want, so the list will help you identify your priceless
essentials.
Be sure to include the location of each item in your home, (ie., the bookshelf in the guest bedroom,) so that you won't have to trust your memory in an extremely stressful situation, and also so that others would be able to help you if they were around to do so.
Once you've created your list, print it out and put a copy in your preparedness binder, and include one in your 72 Hour Kit. You could also hang a copy in the closet or other area where you store your 72 Hour Kits and other emergency supplies so that's it's there at a glance in an emergency situation.
Happy Homemaking!
Labels:
72 Hour Kits,
Emergency Preparedness,
Evacuating
An Emergency Contact & Evacuation Plan
Here is a basic outline of the information that should be included in your family's Emergency Contact and Evacuation Plan. You can copy and paste the outline directly into a Word document, fill in the info and print it out for your preparedness binder and for each of your family member's 72 Hour Kits!
Our Out-of-State Emergency Contact:
Name:
Phone Number:
Our Family’s Pre-Arranged Evacuation Destination:
Name:
Phone Number:
Direct Route Driving Directions to our Evacuation Destination:
Alternate Route Driving Directions to our Evacuation Destination:
Our Family’s Pre-Arranged Alternate Evacuation Destination:
Name:
Phone Number:
Direct Route Driving Directions to our Alternate Evacuation Destination:
Alternate Route Driving Directions to our Alternate Evacuation Destination:
Happy Homemaking!
Our Out-of-State Emergency Contact:
Name:
Phone Number:
Our Family’s Pre-Arranged Evacuation Destination:
Name:
Phone Number:
Direct Route Driving Directions to our Evacuation Destination:
Alternate Route Driving Directions to our Evacuation Destination:
Our Family’s Pre-Arranged Alternate Evacuation Destination:
Name:
Phone Number:
Direct Route Driving Directions to our Alternate Evacuation Destination:
Alternate Route Driving Directions to our Alternate Evacuation Destination:
Happy Homemaking!
Labels:
72 Hour Kits,
Emergency Preparedness,
Evacuating
Evacuation Checklist
Be prepared and proactive when it comes to possible
disasters or emergencies in your area. DO
NOT EXPECT CITY, COUNTY OR OTHER EMERGENCY SERVICES TO BE AVAILABLE IN THE
EVENT OF A MAJOR DISASTER. Have an evacuation route in mind before something happens, and take into
account possible congested routes and other back roads that may be more
accessible. Keep in mind, however, that you need to listen to all instructions
given by local authorities in the event of an impending emergency, such as a hurricane.
If you receive the order to evacuate, or are in an area of “voluntary
evacuation,” LEAVE. Don’t stick around to be involved in or add to the chaos
that could result. Also, before an
emergency happens, establish an out-of-state emergency contact and make
sure the contact information is in each of your family’s emergency kits.
Long-distance phone service is generally back up before local phone service
after a disaster, AND CELL SERVICE CANNOT BE RELIED ON, so if your family is separated for any reason, instruct them
to call the out-of-state contact to report in. As each family member reports
in, your contact can convey that information to you.
While it’s not fun to think about having to leave your home
for an extended period of time, it is prudent to have a pre-arranged
destination in mind before you get on the road,
(a friend or family member that is far enough away to provide a safe
place to stay until things calm down.) Again, set this up now. Have a plan.
Shelters and emergency services are instantly overwhelmed in the face of major
disasters, so don’t rely on the local shelter if it is at all possible.
Remember, there are people who have nowhere else to go. With a little planning,
you can be much more comfortable and better taken care of, while leaving those
community services available to those who truly have nowhere else, and who
truly need them. If you are reading this, you have the opportunity to prepare
yourself and your family so that you are not adding to the overwhelming
problems that automatically result following major disasters.
These are generic lists, but should help get you thinking about what you would want to do at your house, and gather to take with you in the event of an evacuation. As always, each list should be tailored to your individual needs and circumstances.
BEFORE YOU LEAVE
YOUR HOME:
Shut main gas line off outside
Shut off all water lines to appliances (water heater,
washer, toilets)
Shut off all light switches, unplug appliances & lamps
Shut off all power switches in fuse box
If you are able, shut off water main (the city may have to
do this)
Items to Grab in
Evacuation (as time allows):
Your Family’s 72-Hour kit
Individual 72-Hour kits
Your Pet’s 72-Hour Kits
Emergency/Preparedness supplies as applicable
Camping Gear, Tent & Tarp, Sleeping Bags, Sleeping Pads
Blankets/Quilts/Pillows
Laptop Computer, cell phones & chargers, external
hard-drive back up
Financial, Medical & Family Historical Records
Photo Albums, small family heirlooms, priceless photographs
or other irreplaceable items
Photos in frames from around house
Labels:
72 Hour Kits,
Emergency Preparedness,
Evacuating
72 Hour Kits for Family Pets
Regardless of what you think about Crazy Cat Ladies, if you own a pet, (even if it's just an outdoor cat that occasionally comes home for a meal,) in order to be a responsible pet owner, you need to make provisions for your pets in the event of an emergency where you may have to leave your home.
Just as your kit should include essential items that would sustain and keep you comfortable for 72 hours, or three days, so too, your pets need this. And they can’t do it for themselves! I prepared emergency kits for both my dogs using guidelines created by the ASPCA after Hurricane Katrina. You may remember after the hurricane hit, many pets were either abandoned or had to be left at animal shelters because most of the time, public shelters will not allow pets. Animal shelters, however, will not take pets that do not have clear record of vaccination and most of us do not have these readily on hand.
The following items and information are recommended by the ASPCA as essential items to include in your pet’s emergency kit. This list is specific for a dog. As always, tailor this list to your individual pet and circumstance.
72 Hour Kit for a Family Pet
Happy Homemaking!
Just as your kit should include essential items that would sustain and keep you comfortable for 72 hours, or three days, so too, your pets need this. And they can’t do it for themselves! I prepared emergency kits for both my dogs using guidelines created by the ASPCA after Hurricane Katrina. You may remember after the hurricane hit, many pets were either abandoned or had to be left at animal shelters because most of the time, public shelters will not allow pets. Animal shelters, however, will not take pets that do not have clear record of vaccination and most of us do not have these readily on hand.
The following items and information are recommended by the ASPCA as essential items to include in your pet’s emergency kit. This list is specific for a dog. As always, tailor this list to your individual pet and circumstance.
72 Hour Kit for a Family Pet
- Animal Transport Crate
- 1-Gallon Drinking Water
- 9 cups dry dog food (1 cup/3x a day)
- 1 or 2 cans wet dog food
- Small bag of treats
- Extra Collar
- Extra Leash
- Cloth Muzzle
- Tie-out and cable or long chain
- Dish for food/water
- Favorite toy or chew
- Paper towels or Lysol wipes
- 10-12 extra plastic bags for cleaning up
- Small hand trowel for cleaning up
- Copies of license, shots, vet records
Happy Homemaking!
72 Hour Kit Family Pack Checklist
This list of items would be for your entire family's use, and should be stored in it's own bag, or perhaps as an addition to Dad or Mom's kit. Again, this is a generic list and should be tailored to your family's individual needs and circumstance.
Copies of homeowner’s documents (title, deed, homeowner’s insurance)
Copies of other important financial documents or papers
Copies of medical insurance info., current prescriptions, other important info.
List of emergency telephone numbers for quick reference
Out-of-State emergency contact name & number
Small Photo Book with family pictures
Small notebook & pen for journaling or other needs
Extra checkbook
Extra Car & House Keys
Happy Homemaking!
Living Essentials:
Small, portable tent or tarp suitable for shelter if needed
Tarp for ground cover
Flashlight w/ Batteries
Extra Batteries
Cook Stove (small backpacker’s style)
Lantern (small backpacker’s style)
Lantern Mantles
Propane or fuel for lantern & stove
Water Proof Matches
Toiletries:
Pack of Baby Wipes
Roll of Paper Towels
Small Bottle of Dish Soap
Dish Towel
Utilitarian Items:
Flathead/Phillips screwdrivers
Hammer
Hatchet
Quality Hunting Knife
Leatherman or All-purpose tool
Heavy work/gardening gloves
50 ft. Nylon Rope
Roll of Duct Tape
Family 1st
Aid Kit:
Rolled Gauze
Plain Absorbent Gauze Pads
Adhesive Tape
Small Scissors
Eye Pads
Fingernail clippers
Thermometer
Tongue Depressors
Small Container Vaseline
Small package of Needles
Box of Vinyl/Latex Gloves
Rubbing Alcohol
Hydrogen Peroxide
Extractor Bite/Sting 1st Aid kit
Surgical Sutures
Neosporin
Sterile Saline Eye Wash
Safety Pins
Boric Acid
Anti-biotic lotion & soap
Eye Wash Glass
Triangular Bandages
Ace Bandages
Misc. Items:
Copies of birth certificates, social security cards,
driver’s licenses, passports, etc.Copies of homeowner’s documents (title, deed, homeowner’s insurance)
Copies of other important financial documents or papers
Copies of medical insurance info., current prescriptions, other important info.
List of emergency telephone numbers for quick reference
Out-of-State emergency contact name & number
Small Photo Book with family pictures
Small notebook & pen for journaling or other needs
Extra checkbook
Extra Car & House Keys
Happy Homemaking!
72 Hour Kit Individual Checklist & Guide
Here is a generic list of items that could be useful in a 72 Hour Kit. These items should be adjusted for your area’s climate, and the age
& needs of the individual…remember that emergencies can happen anytime, so
pack for all seasons.
Do NOT use “pop-top” cans, since heat can make them explode; pack a can opener (a small P-38 emergency can opener is best) in each 72-hour kit and use traditional cans!! They will last much longer and you will avoid food spoilage and messes.
Remember that there are many options for your emergency kit. While freeze-dried “backpacker’s meals” or MRE’s, (meals-ready-to-eat) may be the lightest weight, and easiest to store, they tend to be very expensive. It’s not necessary to spend a great deal of money to put a kit together. Start today using what you have in your pantry and around the house. You can add to or upgrade your kits later as you are able. DON'T WAIT BECAUSE YOU CAN'T AFFORD THE BEST RIGHT NOW. Start today with what you've got. You'll never regret it.
Happy Homemaking!
Clothing Items:
Good Shoes, (tennis shoes, hiking boots)
Flip-flops
Stocking Cap
Baseball Cap
Extra Socks
Heavy Pants or Jeans
1-2 Belts
2 T-shirts
Underwear/Bra
Sweatpants/PJ pants
Shorts
Sweatshirt
Winter coat
Thermal gloves
Poncho
Toiletries:
Bar of Soap
Wash Cloth
Hand or Shammy Towel
Deodorant
Toothbrush
Toothpaste & Dental Floss
Feminine Products as needed
Roll of Toilet Paper (in zip-lock bag)
Extra pair of eye glasses
Extra Contacts
Contact solution
Small Hand Mirror
Extra plastic baggies for garbage
Other Essentials:
Roll of Quarters ($10)
Flashlight with batteries
Extra Batteries, AA
Foil (3-4 ft. min.)
2 Snap Light Sticks
Knife or razor blades (adults only)
Waterproof Matches
Plastic Whistle
Hand Warmers
Necessary Rx Medications
2 kitchen trash bags
Pocket-Size Scriptures
Emergency Reflective Blanket
Emergency Foil Sleeping Bag
Small Fleece Blanket
Mess kit & utensils
First Aid Kit:
Small sewing kit w/ needle & thread
Assorted Band-Aids
Sterile Gauze Squares
Adhesive Tape
Small Scissors
Tweezers
Q-tips
Cotton Balls
Safety pins
Anti-septic wipes
Aspirin/Ibuprofen
Benedryl
Small Container of Bleach
Misc. Items:
Copies of birth certificate, social security card, driver’s license, passport, etc.
List of emergency telephone numbers for quick reference
Out-of-State emergency contact name & number, evacuation destination, etc.
Small Photo Book with family pictures
Small notebook & pen for journaling or other needs
Individual
Family Member Food Checklist
You will want to check on and rotate perishable items in your 72-hour
kits every six months for optimum freshness and to avoid infestations or other
pest problems.
Do NOT use “pop-top” cans, since heat can make them explode; pack a can opener (a small P-38 emergency can opener is best) in each 72-hour kit and use traditional cans!! They will last much longer and you will avoid food spoilage and messes.
Each family member’s kit should include enough
nutrient-packed food to sustain an individual for 3 days or 9 meals. This
includes minimal water requirements of at least 1 gallon per person. Use your
imagination and tailor this list to your family’s needs and tastes. For Babies,
include necessary items like baby formula, baby food, diapers and wipes. For
individuals with food allergies, include appropriate foods or special diet
considerations.
Remember that there are many options for your emergency kit. While freeze-dried “backpacker’s meals” or MRE’s, (meals-ready-to-eat) may be the lightest weight, and easiest to store, they tend to be very expensive. It’s not necessary to spend a great deal of money to put a kit together. Start today using what you have in your pantry and around the house. You can add to or upgrade your kits later as you are able. DON'T WAIT BECAUSE YOU CAN'T AFFORD THE BEST RIGHT NOW. Start today with what you've got. You'll never regret it.
Sample 72-Hour Kit
Menu:
-
6 Granola Bars (2 a day)
- 6 Cans of Tuna/Turkey/Chicken/Beef Chunks (2 a day)
- 6 Cans of Beans, (Chili, refried, kidney, black, etc.) (2 a day)
- 3 Cans of Mandarin Oranges or other fruit (1 a day)
- 3 Hot Chocolate Pkgs. (1 a day)
- 3 Drink mix Pkgs. (1 a day)
- Trail Mix/Dried Fruit (enough for 1-2 daily snacks)
- Graham Crackers/Cereal/Crackers
- Canned Juice (V-8, Orange juice)
- Canned or Dry Milk
- Candy/Gum (avoid hard candies which can melt in heat)
- 1 Gallon of Water (wash & fill a clear 2-liter soda bottle with treated tap water or for well water, use a couple drops of chlorine bleach to kill bacteria before storage)
Happy Homemaking!
72 Hour Kits: Basic Information
In order to have a well-rounded preparedness plan for your
family, you should include preparations in the event that it becomes necessary
to leave your home (and all of your other provisions) in an emergency
situation. Some people believe that this is possibly the most important aspect
of family home storage and preparedness. As you read through this information,
the most important thing to take away from it is to DO IT NOW. Start today with
items that you have around your house. You don’t need to spend a lot of money,
but you do need to START by compiling the items for your 72-Hour kit TODAY. You
will never regret having taken the time to prepare these things in the event
you ever need to use them!
Where To Start:
Begin with a sturdy bag or backpack that has a sturdy strap and zips shut and
that is large enough to hold a complete kit, (again, you needn’t spend a lot of
money – you can use what you already have around your house, or get one from a
thrift store.) Generally speaking, you should have one bag for each member of
your family that is old enough and strong enough to carry it. Portability is of
the essence, since it may be necessary to walk some distance in the event of an
evacuation. Some state agencies recommend putting all items for your family in
a large garbage can with wheels. This is much better than nothing, but
depending on your circumstances, it may be hard to put a garbage can in your
car if you need to evacuate. Consider your family’s needs first.
Begin today, even if you need to begin by using a pillow
case or paper grocery bag for now. Go over the attached lists, tailoring them
to your personal circumstances and needs. Gather the items that you already
have in one place, and mark down the items that you still need to get.
Designate your storage spot, the place in your home where you will keep your emergency
kits, and keep your fledgling kit there. Take a list with you to the grocery
store the next time you go grocery shopping and pick up a few items each time
until your kit is complete. Just start now, and keep working on it!
Before you start, take the time to think through a few “what
if” scenarios to determine what will be best for you and your family. Think in
terms of A.S.A.P.: Attainability, Storability, Accessibility
and Portability. It isn’t wise to spend a lot of money you don’t have in
order to compile a fancy emergency kit. It is also NOT wise to put off
organizing your kit until you have the money. Decide on what you can afford and
work with what you have NOW. Storability, accessibility and portability are
things you’ll want to keep in mind as you compile and maintain your family’s
kit.
A Word About Storage:
Store kits in a cool, dry place, away from sunlight, preferably in a closet
near the front entrance of your home. Remember in the event of a natural
disaster or other emergency, this kit should be readily accessible at a moment’s
notice. Placing kits in the back of storage sheds, under stairs or in other
areas which may become inaccessible in an emergency may render them useless.
Careful thought and planning should go into the storage location of your
family’s emergency kits.
Happy Homemaking!
Happy Homemaking!
Subscribe to:
Posts (Atom)